OilChat Topics #OilChat 80

Welcome to the eightieth edition of our newsletter. OilChat was introduced way back in October 2015 in response to requests and suggestions from our customers, distributors and our own sales team. The objective was a regular publication to share topical information about the oil industry, and lubrication in particular.

The topic of the inaugural issue of OilChat was Lubricating Base Oil since it is the foundation of most lubricants. The following editions of the newsletter focused on various basic subjects, such as viscosity, lubricant additives, oil formulations and lubricant specifications, to furnish our OilChat readers with a sound knowledge of the basics of lubrication. Thereafter lubricant applications were the key discussion subjects, with The Journey of Oil in the Engine one of the most popular topics.

More recently we have been writing about a broad range of lubrication related issues based on what is happening in the oil industry, new developments and topics of importance to everyone with interest in lubrication. Last, but certainly not least, some of the articles were based on questions and suggestions from you, our readers.

All previous editions of OilChat are still available on our website and are a useful encyclopedia of information on many aspects of lubrication and the oil industry. In fact, if you are au fait with the contents of all the newsletters you will be very much on par with delegates that have attended one of our Basic Lubrication Courses. To access our newsletters simply go to www.q8oils.co.za and click on the tab OilChats at the top of the homepage.

The newsletters are listed in numerical order but considering the number of OilChats that were issued since October 2015, it may be quite time consuming to find a bulletin dealing with a specific topic. To simplify your search we attach an index of all the OilChat topics we have published to date. In conclusion we wish to thank all OilChat followers for the loyal support of our forum. We want this newsletter to be of continued interest and value to you, so please share your feedback and suggestions with us to help us to improve your OilChat experience. Please mail any recommendations or questions that you may have to info@bcl.co.za or phone us at 011 462 1829.

INDEX OF OILCHAT TOPICS

No TOPIC No TOPIC No TOPIC
1 Lubricant Base Oil 28 Automatic Transmission Fluid 55 Covid-19 and the Oil Industry
2 Viscosity and Viscosity Index 29 Borderline Pumping Temperature 56 AW vs EP additives Pt 1
3 SAE Engine Oil Viscosity Grades 30 Hydraulic Oil Selection 57 AW vs EP additives Pt 2
4 SAE Gear Oil Viscosity Grades 31 New Q8 Diesel Engine Oil 58 Chainsaw Lubrication
5 Industrial Oil Viscosity Grades 32 Total Base Number 59 Heat Transfer Oil
6 Industrial Gear Oil Classification 33 Cylinder Bore Polishing 60 Multigrade vs Monograde Oil
7 Engine Oil Composition 34 Cylinder Bore Glazing 61 Bicycle Service Products
8 API Petrol Engine Oils 35 Viscosity Index Improvers 62 API GL-6 Gear Oil
9 API Diesel Engine Oils 36 Detergent Dispersant Additives 63 UTTO vs TO-4 Fluid
10 Q8Oils Antwerp Blending Plant 37 Metal Working Fluid 64 All About AdBlue
11 ACEA Engine Oil Sequences Pt 1 38 Metal Working Fluid Management 65 Rock Drill Lubricants
12 ACEA Engine Oil Sequences Pt 2 39 Slideway Lubricants 66 To Flush or Not to Flush
13 API Gear Oil Classifications 40 Limited Slip Diff Lubrication 67 Contamination Destroys Hydraulics
14 Automotive Gear Oil Applications 41 Fuel Economy vs Engine Wear 68 Grease Intervals and Amounts
15 Lubricating Grease Pt 1 42 HTHS Viscosity 69 Overfilling Engine Oil
16 Lubricating Grease Pt 2 43 Lubricant Storage Life 70 Engine Oil Level Rising
17 Universal Tractor Lubricants 44 Two-Stroke Engine Lubrication Pt 1 71 Diptstick Oil Analysis
18 Flash Point 45 Two-Stroke Engine Lubrication Pt 2 72 Blotter Spot Engine Oil Test
19 ACEA Oil Sequences 2016 46 Two-Stroke Engine Lubrication Pt 3 73 Crackle Test for Water in Oil
20 Compressor Lubrication Pt 1 47 Soot in Engie Oil 74 Cavitation
21 Compressor Lubrication Pt 2 48 Engine Oil Deterioration 75 Gear Wear Pattern Analysis
22 Lubrication Regimes 49 Lubricant Aeration and Foaming 76 Oil Filter Analysis
23 Pour Point of Lubricating Oil 50 Base Oil Classification 77 Machine Health Checks
24 Grease Oil Separation 51 Chain Lubrication 78 The Danger of Water in Oil
25 Antifreeze Engine Coolant 52 Air Tool Lubrication 79 Extended Engine Oil Drain Intervals
26 The Journey of Oil in the Engine 53 History of Lubrication Pt 1 80 Index of Topics
27 Brake Fluid 54 History of Lubrication Pt 2
drain car oil

Extended Engine Oil Drain Intervals #OilChat 79

drain car oil

Regular oil changes are vital to the health of your engine irrespective whether you drive a small car or a heavy-duty commercial vehicle. In the past oil change guidelines required more frequent services. With advances in engine technology and enhanced oil formulations the drain intervals of engine oil have increased drastically – heavy duty diesel engine oils in particular.  ed.

Original Equipment Manufacturers (OEMs), the European Automobile Manufacturers’ Association (ACEA) and the American Petroleum Institute (API) have developed tests and specifications for long drain engine oils. Although these are designed to replicate real world use, the South African operating conditions are significantly more severe than in most other countries. Trucks operate in hotter environments, on rugged terrain, in areas of high dust, over long distances and, last but not least, with heavy loads.

Lubricant manufacturers often promote their high-performance engine oils (ACEA A3/B3 & E7, API CK-4 & SN, etc.) as Extended Drain or Long Life lubricants. In response the following question is frequently asked How long can I extend my oil change intervals? Alas, there is no simple and straight forward answer to the question. Engine oil is drained for two reasons:

  • Additives are consumed during the life of the oil in the engine and may get depleted.
  • To drain contaminants out of the engine when the used oil is replaced.

Very often the oil is contaminated beyond safe limits before the additives in the oil are depleted.

The following lethal contaminants can be root causes of premature oil degradation and engine failure:

Dust:

The ingestion of hard abrasive dust particles via the air intake system into an engine leads to rapid wear of engine components. Less than 100 grams of dust can severely affect expected engine life. A ten-litre diesel engine with a defective air filtration system spinning at 1400 rpm can breathe in up to 500 milligrams of dust per minute.

Fuel:

Frequent cold starts of an engine, excessive idling, cold running conditions and a defective fuelling system can lead to dilution of the engine oil with unburned fuel. Fuel dilution reduces the viscosity of the oil and also causes wash-down of oil on cylinder liners which accelerates ring, piston and cylinder wear.

Soot:

All internal combustion engines produce soot due to incomplete fuel combustion. It is a common misconception that soot does not occur in petrol engines, but it does. It is, nevertheless, not such a big problem in petrol engines as in diesel burners. The soot reaches the engine oil via blow-by past the cylinders. High concentrations of soot lead to viscosity increase, sludge, engine deposits and increased wear.

Water:

Frequent cold starts and extended periods of idling, especially in wintertime, causes water condensation in the crankcase. Water is one of the most destructive contaminants in lubricants. It attacks additives, causes rust, induces base oil oxidation and reduces hydrodynamic oil film strength. It also increases the corrosive potential of common acids found in used engine oils.

Glycol:

Most engine coolants contain glycol. It can get into the engine oil due to defective engine seals, leaking head gaskets, cracked cylinder heads, corrosion damage and cavitation of wet liners.

Glycol reacts with oil additives and causes precipitation. This affects the performance of the oil negatively. Less than one percent of coolant containing glycol in diesel engine oil is enough to coagulate/clot soot and cause a dump-out condition leading to sludge, deposits, oil flow restrictions and filter blockage.

Now back to the question How long can I extend my oil change intervals? It should be obvious by now that you need to know the condition of the used oil to determine suitable engine drain intervals. Various late model vehicles and construction equipment are fitted with telematic systems. Telematics combine GPS, onboard diagnostics, sensors and other technologies to record and transmit real time vehicle data that includes oil and filter health. This allows you to make decisions regarding oil drain intervals without waiting to bring the vehicle in to the workshop.

The majority of engines operating in South Africa, however, are not fitted with telematics and sensors to determine the condition of the oil, and oil analysis is the best tool to determine safe oil change intervals.  In addition, a good oil analysis program can also help reduce unscheduled downtime, improve reliability, extend engine life and reduce maintenance costs.

Finally, talk to your engine, filter and lubricant suppliers. At Q8Oils we have the people, products and proficiency to assist you to optimize your oil drain intervals, reduce maintenance costs and to extend engine life. Simply phone 011 462 1829 or email us at info@bcl.co.za. Our lubricant experts will be happy to answer any questions you may have.

water in oil

The Danger of Water in Oil #OilChat 78

water in oil

Water in lubricating oil has been a point of keen debate for as long as oil analysis has been used to monitor lubricant and equipment condition. Water is one of the most destructive contaminants in most lubricants. It induces base oil oxidation, attacks additives, and interferes with oil film strength. Low levels of water contamination are not abnormal in lubricating oil, but higher levels of water ingression merit attention and the source needs to be investigated.

All lubrication systems  are susceptible to water contamination. Water can enter the oil through any opening – a crack or puncture, a poorly fitting filler cap, a loose inspection lid, an uncapped filling point, a busted seal or an open or damaged vent. Condensation is another common way for water to get into the oil – lubricating systems subjected to high temperature variations in particular. Equipment and machinery that are in direct sunlight are especially vulnerable to condensation when cooling down during the night. In addition, engine oil is disposed to water intrusion due to frequent cold starts and coolant leaking into the oil. Last but not least, water can be added to the oil by accident or human error.

Following is a brief  discussion of the harmful effects that water contamination has on lubricants:

Foaming:

Water is often a cause of foaming and air entrainment in lubricating oil. Foam is a collection of small bubbles of air that accumulate on or near the surface of the oil. In severe cases, the foam can leak out of the machine through breathers and dipsticks. Foam is an efficient thermal insulator, hence the temperature of the oil can become difficult to control. The presence of air bubbles in the fluid can also lead to excessive oxidation, cavitation and impaired lubricating properties.

Rust and Oxidation:

The presence of water in a lubricating oil can cause the progress of oxidation to increase tenfold. This may result in premature aging of the oil, particularly in the presence of catalytic metals, such as copper, lead and tin. It also induces rust and corrosion when in contact with iron and steel surfaces for extended periods of time. Rust can cause abrasive wear when a hard, rough surface slides across a softer one. Once an oil starts to oxidize, you may also see an increase in the acid number of the oil as discussed below.

Lubricant Degradation:

Water not only accelerates oxidation of metal surfaces, but also of the oil itself by depleting oxidation inhibitors within the lubricant. When oxidation occurs, acid formation can follow soon after. There is also the obvious change in viscosity. Add water to any other fluid, and the viscosity will decrease when hydrolysed. Hydrolysis is a chemical reaction where water breaks down the chemical bonds that exist within the oil. Conversely, if the water is emulsified into the oil, it can produce sludge, which will increase the viscosity. The ability of a lubricant to resist chemical decomposition in the presence of water is known as the hydrolytic stability of the oil. A lubricant will perform better in wet/humid environments when it has good hydrolytic stability.

Decreased Load Carrying Capacity:

The film strength of oil becomes impaired in the presence of water, Proper lubrication is dependent on the formation of a hydrodynamic oil film (see OilChat 22) to separate opposing friction surfaces. When pressure is applied to an oil film, the viscosity of the oil will increase proportionally to maintain protection. Water does not exhibit this tendency and will cause boundary lubrication where full fluid film/hydrodynamic lubrication would otherwise be present.

In journal bearings the presence of water can result in a loss of the hydrodynamic oil film strength that leads to increased wear. As little as one percent water in oil can reduce the life expectancy of a journal bearing by as much as 90 percent. For rolling element bearings, the situation is even worse. In addition to reduced oil film strength, the extreme pressures and temperatures generated in the load zone area of rolling element bearings can result in instantaneous flash-vaporization of the water. This promotes erosive wear.

Cavitation:

The phenomenon of cavitation is the formation and collapse of cavities (bubbles) in a liquid. Vaporous cavitation occurs when water vapor bubbles are formed in the low-pressure section of lubricating systems, e.g. on the suction side of the oil pump. When these bubbles travel to high pressure zones in the system they implode and condense back to the liquid phase. The collapse of the vapor bubbles can generate great forces and cause surface fatigue/erosion at the point of collapse. Read more about cavitation in OilChat 74.

Hydrogen Embrittlement:

Embrittlement is the loss of the ductility of a material, thus making it brittle. An embrittled product fails by fracture without deforming. Hydrogen embrittlement occurs when water in the oil finds its way into the microscopic cracks in the metal surfaces of components. When water is exposed to excessive pressure, it decomposes into its components (hydrogen and oxygen) and the hydrogen is released. This can force the microscopic cracks to open wider, and thus make them larger and more susceptible to fracture.

Water is a major cause of lubricant breakdown, poor machine reliability and component failure. Like all contaminants, it is important to take steps to control or eliminate the source of water ingression. To control moisture levels, one must be able to detect its presence. The crackle test is a simple test to identify the presence of free and emulsified water in oil. The crackle test was discussed at length in OilChat 73.

If you have any questions regarding this newsletter or any other lubrication related issues simply email us at info@bcl.co.za. Our lubricant experts will be happy to answer any questions you may have.

Machine Health Checks #OilChat 77

Doctors have perfected the art of conducting physical exams. They know what questions to ask and how to examine the body for clues that signify health, injury or disease. Maintenance staff, lubrication technicians and even equipment operators should be competent to perform ‘physicals’ as well. Like the doctor, they need to be aware of subtle changes or symptoms that might be an early sign of machine malfunction or accelerated wear.

One of the obvious problems with conducting such inspections is that for most machines, the critical operating components, including the lubricant itself,  are shielded from view by panels, casings, guards and housings. It is like asking your doctor to give you a physical while wearing body armour. Nevertheless, the machine and the lubricant can telegraph hints and signals in various ways and the selection of machine inspections should be tailored to the machine design and operating environment. This is done by selecting which inspections are needed and how frequently they should be carried out.

Following is a list of problem-revealing tests and inspections related to lubrication. They require limited technical proficiency and most of the tests involve no special tools or instruments.

Colour Change:

Monitor changes in lubricant colour with sight glasses and oil samples. Oils that have been subjected to high temperatures will exhibit marked changes (darkening) in colour and opacity. Many types of contaminants will alter colour as well. Additionally, a wrong lubricant can often be recognized by a change in darkness or colour.

Air Release Capability:

Most healthy lubricants will release entrained air readily. Distressed and contaminated lubricants may fail to release air from the oil and may also form sustained surface foam. Aeration and foaming (see OilChat 49) are not always oil related and may point to air entering the system or mechanical problems. Sight glasses and inspection hatches may provide the first sign of a problem.

Water Shedding Ability:

Water and oil usually do not mix. However, if they become conjoined in an emulsion, the problem is often associated with a change in the oil properties or contamination. Observing oil/water separation after violently mixing quantities of each in a sample bottle or laboratory glassware is an easy check for this property.

Blotter Spot Test:

This inspection involves placing a drop of oil on blotter paper and then observe how the oil spot ‘develops’. Healthy oil does not produce any structures and will spread out evenly on the paper, leaving a uniform gradient of oil colour behind. When the oil is badly contaminated, serrated patterns may form or the contaminants can clump together and do not migrate with the oil front. The Blotter Spot Test was discussed in detail in OilChat 72.

Sediment and Water:

It is often said that what is bad for the oil or material that has been removed from machine surfaces is also heavier than the oil. We know that substances heavier than the oil will settle out when mixed with the oil. That is why there is great wisdom in inspecting for water and sediment using drain port sampling.

Noise:

Few machines are quiet during operation. Even completely healthy machines have something to say. You may have heard the saying “a singing gear is a happy gear”. This is often true, but not always. Machine sounds change for specific reasons. Try to locate the point of generation. Some maintenance technicians play doctor by using crude stethoscopes in the form of a garden hose, a screwdriver or a steel rod held to their ear, with the other end touching potential noise-generating areas.

Temperature:

Doctors use thermometers but maintenance technicians employ a variety of tools including online temperature probes/thermocouples, thermal imaging cameras or handheld heat guns. A few common causes of temperature changes are wrong lubricants, degraded lubricants, contaminated lubricants, abnormal friction/wear – and the list goes on.

Pressure Change:

In the same way oil temperature can change in response to an assortment of problems, oil pressure can increase or decrease as well. Anything that can change viscosity or form surface deposits can change system pressure. For similar reasons it is no surprise that doctors pay special attention to blood pressure during an exam.

Filter Life:

There usually is a good reason when filters plug prematurely and it is worthy to investigate what is plugging the filter. Areas of particular concern are soft contaminants (sludge, organic material, dead additive residue, etc.), dust and wear debris. The filter is the final resting place for a variety of machine and lubricant operational waste products as discussed in OilChat 76.

You should have noted the many interesting human health analogies above, but this is just a start. There are far too many field tests and inspections to discuss in a publication like this. For those who make a living caring for the health of lubricants and machinery, the value of being capable to perform machine physicals is immense. Backed by laboratory oil analysis and other predictive maintenance technologies, the modern-day lubrication engineer and condition-monitoring professional is indeed fortunate to have such a ‘clear’ view of the internal state and operational health of his machinery. If you have any queries about Machine Health Checks, please email us at info@bcl.co.za. Our lubricant experts will be happy to answer any questions you may have.


oil filters

Oil Filter Analysis #OilChat 76

oil filters

An inspection of an used oil filter can be quite helpful to determine the condition of the engine. By dissecting a filter, you can discover information about the quality of the filter itself by checking for collapsed media, bad seals or weak points that may have formed in the filter media during use. You may also learn a lot about the health of the engine by analysing the debris caught in the filter.

The purpose of the oil filter is to trap contaminants suspended in the engine oil as it flows through the filter. This is accomplished by the filter medium inside the filter body. The medium typically allows the passage of very small particles (less than 5 microns) but traps the larger ones (greater than 5 microns). These are the ones you will find inside a filter when it is dissected.

filter

If the filter is of the canister type, a simple and inexpensive method is to cut the filter housing open to remove the media. There are special tools available to do so. A typical example is shown on the right. Do not use a hacksaw since the metal shavings could be mistaken for wear metals. Once open, slice the filter media away from the centre tube with a sharp knife or razor blade. Lay the media out onto a clean surface and spread the pleats apart to look for any contaminants.Filter

Filters prevent large particles from damaging the engine, but they also mask significant component wear from regular oil analysis. Following is a discussion of what you must look for in the filter media:

Ferrous Metals

filter iron steel particles

Iron and steel particles are easy to identify because they are magnetic. Simply run a magnet across the particles to verify if they are ferrous. Iron and steel debris can originate from cylinder walls, camshaft lobes or the crankshaft. Abnormal wear of these components may release pieces into the engine oil and subsequently into the oil filter. Depending on the size of the pieces and the condition of the engine, you may want to inspect the components mentioned above sooner than later.

Non-Ferrous Metals

filter aluminum particles
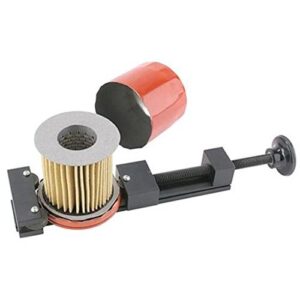
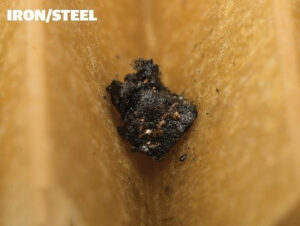
Many modern engines use lightweight aluminium components and pinpointing the origin of shiny aluminium particles in the oil filter can be difficult. One area that experiences regular wear is the piston skirt. Abnormal wear of the piston skirts is often due to contamination that has entered the combustion chamber or the use of the wrong engine oil. Checking the air intake and filter system is a good idea if you believe contamination has entered the engine.


filter lead particles
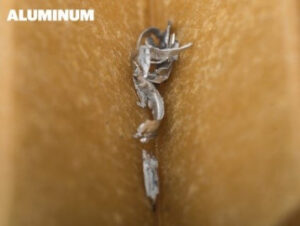
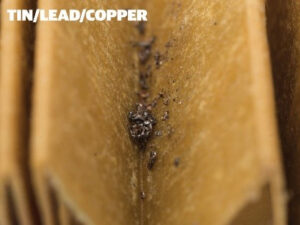
Other small, shiny particles that can be confused with aluminium are tin, lead and copper. These materials are often used in the Babbitt alloy layer of the main and piston rod small end bearings. Insufficient lubrication of these bearings can lead to premature wear of the Babbitt layer and eventually to the failure of the bearing. If remnants of tin, lead or copper are found, it would be wise to ensure that the engine is being properly lubricated with the correct oil.

Non-Metallic Materials

filter - carbon particles
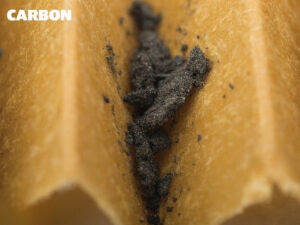
In many cases, you will find some amount of carbon, which is difficult to identify, but the use of a magnifying glass can help. When rubbing carbon between your fingertips it will feel slightly gritty but it will break apart easily. Carbon accumulation is typically a result of blow-by getting past the piston rings. If your engine suffers from excessive oil consumption and low cylinder compression readings, you most probably have worn or damaged piston rings.


In many instances elements found trapped in the oil filter can point you in the right direction when attempting to diagnose an issue with an engine. Sometimes more information may be required and the filter will have to be sent to a professional laboratory for analysis. Either way the debris needs to be identified to take the necessary action to prevent possible serious engine damage.

At Q8Oils we have the people, products and proficiency to assist you with all your lubrication requirements. For more information phone 011 462 1829, email us at info@bcl.co.za  or visit www.bcl.q8oils.co.za. Our lubricant experts will be happy to answer any questions you may have.

scuffing - gear wear

Gear Wear Pattern Analysis #OilChat 75

scuffing - gear wear

A simple visual inspection of gear wear patterns can aid in identifying latent problems and looming gear failures. Once the problem is identified, there are ways to avoid some of the common culprits, such as gearbox design and materials, operating conditions and loading, misalignment and insufficient lubrication. Any of these can have a major influence on performance and reliability but in this publication we will focus mainly on misalignment and lubrication related problems.

Misalignment of the gearbox shafts is a common reason for gearbox failures and is often the result of wrong installation and setup procedures. Even if the initial alignment is within acceptable tolerances, operating and environmental conditions can eventually cause the shafts to become misalignment, e.g. loads generated during operation and the transmission of power through the gearbox can result in shafts or other gearbox components deflecting. Temperature variations can also result in expansion or contraction of the shafts or gearbox components (especially the gearbox housing) which will consequently cause the shafts to become misaligned. It is therefore essential to start the inspection by checking the alignment of the shafts and gears inside the gearbox.

misalignment2misalignment1

An even wear pattern along the tooth surface as shown on the left, indicates that the gears are aligned correctly. Misalignment is exhibited as abnormal wear at one end of the tooth as depicted on the right.


Gear tooth surface wear can be described as the removal or displacement of material due to mechanical, chemical or electrical action. In this publication discussions will be limited to the following mechanical wear modes which are lubrication related:

ABRASION

abrasion - gear wear
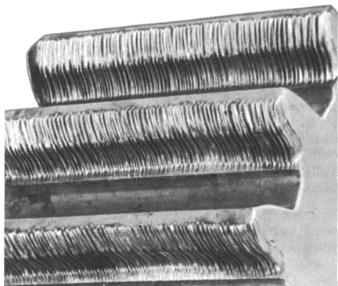
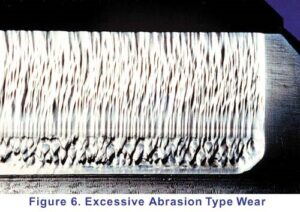
Abrasion can range from mild to severe. Very mild abrasion may cause polishing of gear teeth. Moderate abrasion consists of fine scratches with little removal of material from the contact surfaces. Severe abrasion manifests itself as deep grooves on gear teeth as shown on the right. Abrasive wear is brought about by particle contamination of the oil or rough gear surfaces as discussed below:


Three-Body Abrasion occurs when hard contaminants (dirt or wear debris) in the oil are trapped between two meshing gear teeth. When the size of the particles is greater than the fluid film thickness of the oil, scratching, scraping or ploughing can occur. This creates parallel scrape marks in the direction of motion (from the base of the gear tooth to the tip), like rough sanding. Mild abrasion by fine particles can cause polishing with a satiny or matt appearance. Three-body abrasion may be prevented with improved oil filtration, flushing and sealing out foreign particles.

Two-Body Abrasion happens when metal asperities (surface roughness, peaks) on one gear tooth cut directly into a meshing tooth. Contaminant particles are not directly involved in this instance. The contact occurs in the boundary lubrication regime (see OilChat 22) due to inadequate lubrication or excessive surface roughness which could have been caused by some other form of wear. Higher oil viscosity may help to reduce two-body abrasion.

PITTING (ALSO KNOWN AS SPALLING)

pitting - gear wear
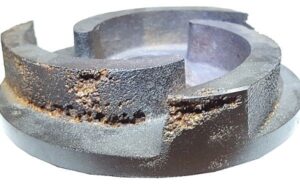
The formation of pits or holes on gear teeth is called pitting and is caused by overload conditions on the gear tooth surface. Severe pitting is also referred to as spalling. A pit forms when small cracks (due to overloading) grow long enough to separate a piece of material at the surface. These irregularities cause additional friction and result in a lot of heat being generated, which in turn reduces the viscosity of the oil. A possible solution would be to use an EP oil with higher viscosity.

SCUFFING, SCORING OR GALLING

scuffing - gear wear
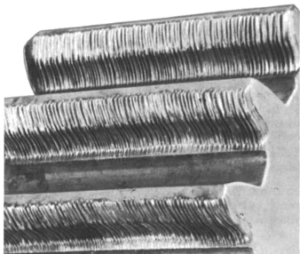
Scuffing or scoring can be described as grooves over a wide area of gear teeth. Scuffing leads to the much more serious wear mechanism referred to as galling as seen on the left. It occurs when a lack of lubrication causes metal-to-metal contact of gear teeth, resulting in elevated temperatures. This can result in localized welding in contact areas. Metal is then ripped from one surface and transferred to the other. This type of wear is also referred to as adhesive wear.


metal flow
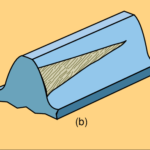
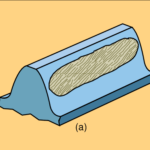
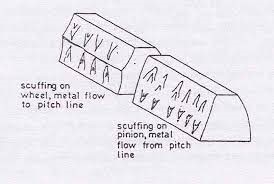
On driven gears metal ‘flows’ towards the middle of the gear teeth, along the length of gear teeth, as shown above and on the left gear tooth in the adjacent diagram. On driving gears metal propagates away from the centre line of the gear as depicted on the far right. Possible solutions would be to use an EP oil with a higher viscosity and reducing the temperature of the oil.


Gear wear pattern analysis can identify the root cause of many gear problems and with appropriate lubrication practises the wear modes discussed above may be avoided. Should you have any questions about gear lubrication or want to find out more about the extensive range of Q8Oils gear oils, please phone 011 462 1829, email us at info@bcl.co.za or visit www.bcl.q8oils.co.za

Cavitation #OilChat 74

Cavitation is a phenomenon that occurs in various formats around us every day of our lives. In terms of fluid dynamics it can be described as the formation and collapse of cavities or bubbles in flowing liquids. Cavitation may well result in the pitting or erosion (wearing away) of solid surfaces, such as metal or concrete, that are in contact with the liquid.

Cavitation in rotating components


Cavitation is often associated with components that rotate in a liquid, e.g. boat propellers, hydraulic oil pump elements and water pump impellers as shown on the right. Other common examples of cavitation are found in diesel engines with wet liners and where water is flowing over dam walls.

Surfaces in contact with a liquid undergo cavitation erosion or pitting due to pressure fluctuations in the surrounding liquid. In most instances the pressure fluctuations are generated by the movement of the surface itself. Following is a brief description of the cavitation process:

Cavitation process
  1. Bubbles in the liquid grow when pressure decreases.
  2. Maximum bubble size at lowest pressure.
  3. Reduction in bubble size when pressure increases.
  4. Bubbles collapse (implode) when pressure is high enough.


The sudden volume contraction/collapse results in an energetic implosion accompanied by shock waves and high velocity microjets that impact and damage the solid surface.

Vapour cavities or air bubbles may be present in a liquid due to various reasons. In the following diagram a restriction in the suction (low pressure) line of a hydraulic system results in the formation of vapour bubbles in the oil. As the oil passes from the suction side of the pump to the delivery (high pressure) side, the bubbles implode.

Cavitation process

The imploding bubbles create the shockwaves that erode the internal pump components. The shockwaves also cause pump vibration and noise. A high speed hydraulic pump that sounds as if it is full of rocks or gravel is a sign of cavitation, which can lead to complete pump failure if you do not track down the cause.

By preventing cavitation, you will increase the efficiency and lifespan of your hydraulic pumps significantly. Keep an eye on internal parts for signs of pitting and corrosion and listen to the pump to ensure you do not hear what sounds like marbles banging around. If you have any questions about cavitation email us at  info@bcl.co.za. Our lubricant experts will be happy to answer any questions you may have.

Crackle Test for Water in Oil #OilChat 73

The crackle test was discussed briefly in OilChat #71 (Dipstick Oil Analysis). It is a quick and easy method to detect the presence of water in oil. To do a crackle test simply put a drop of oil on a hot surface with temperature just over 100⁰C. The oil will bubble, crackle or pop when moisture is present.

With practice, and together with keen eyes and ears, the crackle test can be a semi-quantitative estimate of the amount of moisture present in lubricating oil.  Water is one of the biggest enemies of lubricants and the warning limit for moisture in petrol and diesel engine oil is 0.2 % maximum. A moisture content as little to 0.05% can be detected with the test. Rather than just listening for the crackle, add a visual observation and rating of the number and size of the vapor bubbles produced. This will give an indication of the amount of moisture present in the oil. This method is referred to as the visual crackle test.

Success in using this procedure depends on practice and maintaining a constant hotplate temperature around 160°C. Place a homogenous drop of oil on the hot plate. To ensure a homogenous suspension of water in the oil, agitate the oil sample violently or take a dipstick sample when the engine is still hot. Observe and interpret the test result as follows:

Although the test is reliable in most instances, it does have some limitations:

  • Hot plate temperatures above 160°C induce rapid evaporation that may be undetectable.
  • The method does not measure the presence of chemically dissolved water.
  • The presence of fuel and volatile solvents in the oil could be mistaken for water – indication of light hydrocarbons is a sizzling sound rather than a crackle.

There you have it – dipstick oil analysis in a few simple steps. Checking your engine oil level should never be the same again. Analysing the oil in your vehicle is like sending your blood to the lab for tests and engine oil analysis can provide clues about the health of your engine – without any invasive surgery. The real benefit of oil analysis is that it acts as an early warning system, alerting you of potential problems before they become an engine failure.

Once you have mastered the crackle test and the other oil tests discussed in OilChat #71 and #72 you should be competent to determine the condition of your oil as well as the health of your engine. If you have any questions about these tests email us at  info@bcl.co.za. Our lubricant experts will be happy to answer any questions you may have.

Blotter Spot Engine Oil Test #OilChat 72

More than normal interest was generated by OilChat #71 (Dipstick Oil Analysis) – particularly the section about the blotter spot test – and it was suggested that we elaborate on the subject. The blotter spot engine oil test is cheap and easy and can tell you a great deal about the condition of the oil in your engine.

All you need for the blotter spot test is a piece of white blotting (chromatography) paper, obtainable from stationary suppliers. Whatman 3MM CHR paper with thickness 0.34mm is commonly used for the test.

To do the test, support the paper in a horizontal position so that the spot area is not in contact with any surface. The rim of a a cup or glass provides an ideal support. Take the dipstick from the engine while the oil is still hot and put a small drop of oil in the centre of the test paper. Allow the oil spot to dry. Drying may be accelerated by applying mild heat. An initial observation can be made when the oil spot is dry, but the best results are obtained after twenty-four hours.

The colour of the blotter spot will depend on the type of fuel being used. A petrol engine oil will have a brownish colour as shown on the right. Oil from a diesel engine will leave a grey to black spot (see far right).


The blotter spot has three zones. The significance of each zone is as follows:

Deposit Zoneindication of undispersed soot and dirt. Short service or low contamination/soot level will have a light discolouration or may not appear at all. Excessive service or high soot level will leave a dense, dark small spot.

Dispersion Zoneindicative of remaining dispersancy. Size of this zone is the important factor. The bigger it is, the more dispersancy remains.

Oil Zoneindication of oxidation. A progressive darkening from light straw to amber indicative   of increased oxidation.


Below are interpretations of seven typical engine oil spot tests:

Petrol engine oil with evenly dispersed, light coloured blotter spot – oil fit for further use.


Petrol engine oil with dense, dark blotter spot – oil heavily contaminated, drain oil as soon as possible.


Diesel engine oil with evenly dispersed, light coloured blotter spot – oil fit for further use.


Diesel engine oil with dense, dark deposit zone – oil heavily contaminated, dispersancy depleted, drain oil as soon as possible.


Petrol and diesel engine oil with dark center and distinct brownish coloured outer ring – oil severely oxidized, drain oil as soon as possible.


Soot ring around a yellow/brown centre – oil contaminated with antifreeze/glycol, drain oil as soon as  possible.


Dark center with surrounding rings – possible fuel dilution. Confirm with other tests discussed in OilChat 71 and drain oil if necessary.


Initially it may be difficult to interpret the blotter spot on the basis of a single test result, but as we all know practice makes perfect. Once you have mastered the art of the blotter spot, you will not be able to resist pulling the dipstick of your engine.

If you have any further questions regarding oil analyses phone 011 462 1829, email us at info@bcl.co.za or visit www.q8oils.co.za. Our lubricant experts are at your disposal and ready to provide you with advice and answer any questions you may have.

Dipstick Oil Analysis #OilChat 71

OilChat numbers 69 & 70 addressed the dangers of and possible reasons for engine oil level rising on the dipstick.  But your dipstick can tell you much more than the level of the oil in the engine.  Dipstick oil analysis may sound a bit farfetched, but in fact it can reveal a great deal about the condition of the oil, and even the engine itself.

During its working life inside the engine, motor oil gets contaminated with water, fuel, soot  and other contaminants. The oil is also subjected to chemical  changes,  such as additive depletion and oxidation. Dipstick engine oil analysis is quick, easy and cheap. Simply pull the dipstick out and check the oil as follows:

Water: Bubbles on the dipstick, a brownish residue just above the oil level or milky-brown oil with a thick consistency (high viscosity) are all indications of water in the oil. To confirm the presence of water do a crackle test by putting a drop of oil from the dipstick on a hot surface (temperature 100⁰C or more). The oil will bubble, crackle and pop when moisture is present. Check for white, sweet-smelling smoke coming from the tailpipe. This is a sign of coolant (water and glycol) in the oil.

Fuel: Oil on a dipstick that smells like petrol or diesel is the first sign of fuel dilution. Fuel dilution can reduce the viscosity of motor oil substantially. Another indication of fuel in the oil is when the oil bubbles and boils without a crackle when doing the crackle test.

Soot: Thick darkened oil on the dipstick as shown above, is a sure sign of excessive soot in the oil – diesel engine oil in particular. A carbonaceous odour is another indication of high soot levels in the oil.

Oxidation: When oil oxidises, its colour tends to darken. Badly oxidised oil usually has a  foul, pungent and burnt odour. Oxidised and contaminated oil will lose interfacial tension. A simple test for interfacial tension is to place a drop of oil from the dipstick on the surface of water. If the oil drop spreads out over the surface of the water (instead of clustering up like new oil) it may be time for an oil change.

Additive Depletion: If you are still not sure whether you should change the oil, you can do a blotter spot test to check the additive reserve/concentration of the oil. To do the blotter test,  place a small drop of oil on a piece of blotting (chromatography) paper. The paper should be elevated to avoid contact with the flat surface below. Allow at least one hour for the oil drop to spread out on the paper.

As the oil spreads out, it should carry with it the dark contaminants. Ideall
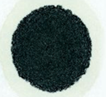
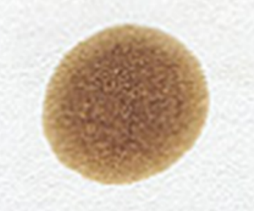
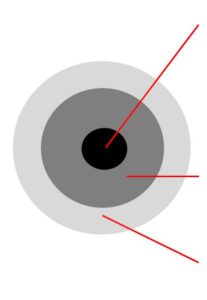
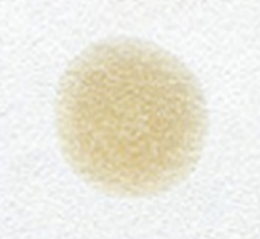
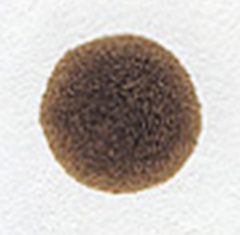
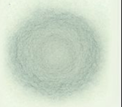
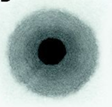
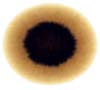
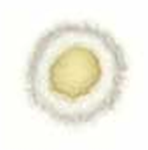
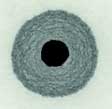
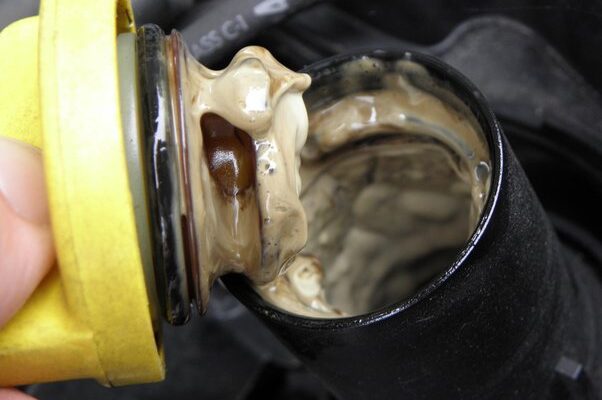
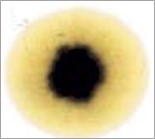
y the contaminant band should spread with the oil to leave a fairly even discoloration. When the oil is badly contaminated, the contaminants clump together and do not migrate with the oil front. This indicates that the dispersancy additive of the oil is depleted.


It is as simple as that. We trust you will now be competent to do your own dipstick oil analysis and that checking oil levels will never be the same again. If you have any further questions regarding oil analyses phone 011 462 1829, email us at info@bcl.co.za or visit www.q8oils.co.za. Our lubricant experts are at your disposal and ready to provide you with advice and answer any questions you may have.